Sunday, July 5, 2009
Closet Inspirations
Friday, June 19, 2009
Unclutter your closet on 'Good Morning America'
It's time to make room for change and move forward with your life!!
Check out the video on this link!
Saturday, June 6, 2009
Closet Makeover
BEFORE
* Too much stuff piled up on top rack.
* Limited hanging space. Tops, dresses, skirts and pants were stuffed into the small space.
* There are some good features. The four drawers is a good way to keep/organize your 'un-mentionables'. So I'll keep this.
* Shoes piled at the bottom of closet.
* Shopping bags left at the bottom of closet.
Here's how I completed this project in one day and for under $50.
Step 1 - First things first... remove ALL (yes, ALL) clothing, shoes, bags from closet.
Step 2 - Sort all your clothes into three piles - 'KEEP', 'DONATE' and 'TOSS' (For more tips on how to de-clutter, see my earlier posting dated May 15th)
Step 3 - Add a shoe rack to organize your shoes. You can also use a hanging shoe organizer.
Step 4 - Add a 6-shelf hanging organizer. This will be great for organizing T-shirts, sweaters, shorts etc.
Step 5 - Add a hanging rod. This will create more hanging space!!
Now you are ready to start putting back you clothes. Remember to de-clutter first. A good rule of thumb is if you have not worn it in 1-2 years, it's time to toss or donate the item. There are a few different ways to organize the space. It's all up to you. There's no right or wrong way to do this.
AFTER (Three ways to organize the space)
* Hang organization shelf on the far side of closet
* Hang shirts, blouses and tops on top hanging rack. I like arrange each category by color. Makes it easy to get dressed in the morning (Trust me)
* Hang skirts and pants on bottom hanging rack.
* Hang dresses on the other side.
* Keep the four drawer shelf.
* Add organization boxes on top shelf together with handbags. These organization boxes come in different sizes and are great for storing small handbags, scarfs, hats etc.
Option 2:
* Same as Option 2 expect for the removal of the small four-drawer shelf. You can keep you un-mentionables on an armoire drawer.
Option 3:
* Hang the hanging organizer in the middle.
* Hang the dresses on one side, and the shirts, blouses and tops on the other side.
* Hang pants on the bottom
* Arrange shoes at the bottom of dresses. You can use the shoe rack as well.
At the end of this project, there was a lot of de-cluttering and as a result, a big bag for donations. The closet looks fantastic!!
HAPPY ORGANIZING! Remember to 'Keep It Organized, Keep It Simple'
Wednesday, June 3, 2009
Kitchen organization products
Tip of the day: Organizing your pantry will help when you are planning the weekly groceries. No more food wasted. Save $$, especially during this economic time.
Two and three-compartment organizer and a tea and sugar holder from Container Store.
Of course, the container that I use to store dry goods to keep them fresh is the jar and lid from the IKEA 365+ product. It comes in three sizes (10 oz, 2 qt, 44 oz). These are dishwasher safe. The container with the removable dividers is also from IKEA (I store teabags and sugar). It comes in 3 sizes as well. All under $4.99 each. (See May 31st posting)
Target has similar products as well. This one is $17.99 for a set of 4.
Sunday, May 31, 2009
Kitchen organization ideas
Since I am on the subject of kitchens, I would like to share with you some kitchen organization ideas and tips from my own kitchen.
1) Multipurpose use of a bookshelf
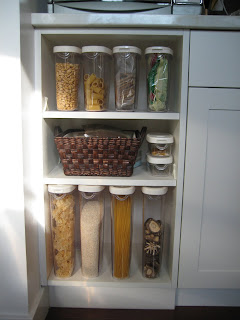
The window would have been wasted space and so, place a shelf or small bookcase in this small nook. The bookshelf is now a place to keep recipe books and also display some kitchenware such as cups, bowls, plates and stemware. So, be creative & use what you already have in your home.
2) Containers
You can store your pasta, rice or cereal in air tight containers and display them. This way, the food will be kept fresh while adding some visual interest in this little nook. Here, I have pasta, rice, walnuts, dried mushrooms in containers. I also added a basket to make it more interesting. You can arrange some recipe books on this shelf as well. The options are endless.
What to do with all the tea bags and sugar packets? I found these boxes with built in dividers to organize them. Keeps it fresh and neatly organized. No more rummaging through drawers or boxes.
I hope you'll find these organization tips useful! I would love to hear your ideas and comments.
Happy organizing.... Just remember to Keep it Organized, Keep it Simple!!
Wednesday, May 27, 2009
More colors, please......
Tuesday, May 19, 2009
Just a little pop of color!
Saturday, May 16, 2009
From Baby's room to French Country retreat....
Believe it or not, this room was a baby's room with bright Winnie the Pooh yellow and bright blue (YIKES!). It was great for a baby but not great for a grown-up's bedroom. So I set out to create a relaxing space. I was going for French country. Found the toile bedding at Target with matching window treatments (HUGE SCORE!).
Also, built some bookshelves above the radiator. It draws your eyes to the high ceilings and adds height to make the small bedroom feel airy.
Total cost was under $200 (I got the comforter set on sale!)
Dining Room: Before & After
BEFORE
Too many chairs cluttered the space.
The walls were bare and felt cold.
The clutter on the fireplace did not showcase the beautiful fireplace.
The picture above the fireplace is too small and is lost on top of the fireplace.
AFTER
The large mirror on top of the fireplace brightens up the space and focuses your attention on the beautiful fireplace. The scale of the mirror is appropriate for the large fireplace.
The dining table and chairs are centered in the room.
The rich color of the rug warms up the space. The rug is placed in the center of the room to define the area.
A small bookcase is placed in the corner. Makes good use of the space. The bookcase was brought in from another room.
Above it some beautiful artwork fills the empty wall. I found the artwork at an antique store (wasn't expensive at all)
This project took a little time to find the right pieces to compliment the space but the end effect was fantastic! I LOVE IT! When it came time to sell, I added two BIG topiaries on the fireplace (one on each side of the fireplace), and also a screen for the fireplace. The cactus next to the fireplace had to go... bad Feng Shui.
Just remember to Keep It Organized, Keep It Simple.
Friday, May 15, 2009
How to start your closet organization project
Here's how to get started:
STEP 1 - Remove all clothing items and shoes from your closet. (Yes, I mean EVERYTHING!)
STEP 2 - Sort all clothing items into three piles - 'KEEP', 'TOSS', 'DONATE'. Go through every piece of clothing. A good rule of thumb is that if you have not worn it in the last 6-12 months or if it has holes, it's time to let it go... 'DONATE' it. If it is torn and can't be mended, 'TOSS' it.
STEP 3 - Next, take a good look at your shoes. Honestly, do you really need THAT many pairs? I say, Quality vs. quantity. Stick to the classics but once in a while, throw in a trendy pair.
Step 4 - Once you have sorted through everything in your closet, it's time to put it back in its proper place. ONLY the clothes in the 'KEEP' pile will go back into the closet. First, organize by season - Fall/Winter and Spring/Summer. Since it is spring, only the SPRING/SUMMER clothes will go back into the closet. Put way the sweaters and coats. Keep them in a box and label it.
Step 5 - Now for the 'DONATE' pile. Place the items in a box or bag, and take it to your local Goodwill or women's shelter.
Step 6 - As for the 'TOSS' pile, dispose of it.
Just remember to 'Keep It Organized, Keep It Simple'.
Tuesday, May 12, 2009
My (inexpensive) closet project
- COATS & JACKETS - Replace all wire hangers with wooden ones. Return the wire hangers to the dry cleaner. They will love you for it. Plastic and wire hanger may not hold the weight of your winter coat, or it may distort your garment
- SHOES - Use a shoe organizer. I found this one at IKEA ($9.99 each). Here I have two hanging on each side. You can hang them side my side as well. I like to arrange the shoes with one facing out ad the other facing inwards. This way I can see the front of the shoe and the heel.
- BOOTS - Line them up at the bottom. To keep the boots from falling over, I stuff them with a rolled up magazine. This helps keep the shape of the boots for next fall/winter season.
- GLOVES & SCARFS - I found matching drawers at IKEA what fits into the shoe organizer. Brilliant, isn't it? They were a steal for $4.99 (pack of 2). I placed one drawer in each organizer. The drawers are great for storing gloves and scarfs. I also store shoe polish or wax.
- ALL OTHER STUFF - Again, I found this matching box from IKEA ($14.99 each). You can get a few and line them up on top. I didn't have much space so, I just have one. I also stack the shoe boxes of new shoes that I just bought on top.
A Blog is Born
I am not sure what else will be included this blog but I look forward to hearing your comments and thoughts.